
I’m moving more and more of my whitebox environment towards Azure. But some parts are still running in my home environment. So I would like to create a Site-to-site VPN between my office @home and Azure. Because an Express Route would be slightly overkill I decided to build an Site 2 Site VPN.
Some information about my test environment @home. I’m running a Hypervisor in a seperate tenant with only 2 virtual machines : pfSense and a Windows 10 virtual machine.
Let me take you through the steps of creating a Site2Site VPN, hold on!
- First make sure that you have a proper working pfSense (2 NIC) instance running.
- You will need at least one public IP address (IPV4), so you probably need a business internet line because consumer internet lines don’t often have static public IP addresses. You need to configure IP Addresses, not DNS names, so DynDNS is no option I’m afraid.
- For testing purposes it’s easy to have a Windows 10 client standing by
Ok, let’s go! First download and install pfSense and the Windows 10 VM. My pfSense virtual machine has 2 network adapters, One WAN (Bridged mode) and one Custom (VMNet 10). The Windows 10 is in the same custome mode (VMNet 10) and is running in a separate subnet (192.168.1.X). Make sure that the LAN interface of pfSense is running the DHCP service.

Log on to the Windows 10 virtual machine and check if you have internet Access :

Check! (great website btw :-)) We have internet access!
Now login to Azure, select your subscription and check create a Virtual Network. In my situation I already had a virtual network (the network I would like to connect to). I only had to make an adjustment.
In my virtual network (@Azure) the following resources are running :
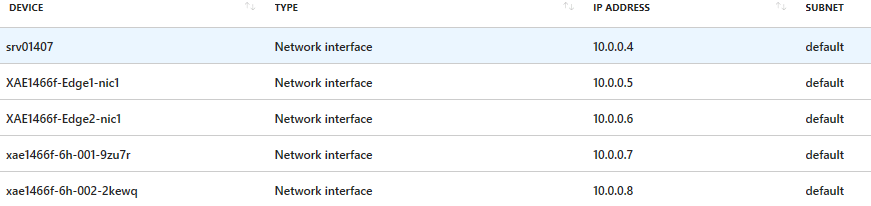
As you can see my network is using the 10.0.0.0 subnet. It was created using the /24 mask but I had to change that to /23. So now my virtual Network is running the 10.0.0.0/23 subnet. You can also create a new virtual network to connect to. For this example let’s use the following information :

In my environment I’m using the same IP addresses. You can choose your own name(s). Now go to the virtual network you’re running or just have created and go to subnets. Click +Gateway subnet.

Add the following information :

Now we are going to create a new Virtual Network Gateway :

Use the following information :

Give it a new, use VPN/Route-based. Choose Basic for SKU (is enough, can be upscaled later). Create a new public IP for your VPN and select the subscription and resource group. Choose to create and wait approx 30 min.
Now we must create a Local Network Gateway :

You can choose your own name, make sure to use your public IP address of the WAN Adapter of pfSense. Choose to create your local network gateway. This can take approx 45 minutes.
Now go to the local network gateway you have just created and go to connections.

Give it a name, a think about a very long & secure Pre Shared Key. Remember this. You will need it later on!

Ok…. #Azure #work #done… now fire up the pfSense interface :
Go to VPN/IPSec. Click on Add P1 at bottom right. This is the first phase of the IPsec tunnel negotiation. Fill out these values and make sure that you replace it with your specific IP. You can find your Azure Public IP here :

Ok, you will need these neccessary info for Phase 1:

For Phase 1 Proposal (Authentication) use the values and I hope you still know your shared private key 🙂 :

For Phase 1 Proposal (Algorithms) use the values :

Use these Advanced options :

Now go to VPN / IPsec / Tunnels

Expand Show Phase 2 Entries and Click Add P2 :

Use the following information (General Information) :

Use the following information (proposal) :

Leave the Advanced configuration default :


Now let’s open pfSense a bit, let’s allow the firewall IPsec traffic. In orde to do that, from the main menu go to Firewall, Rules and then click on the IPsec sub-menu.

Ok, now we are done! Great job… but let’s test it first! Go to the Windows 10 test VM. In Azure I opened RDP and Ping for testing purposes.

As you can see from my internal network @home I can ping and RDP to the INTERNAL (!) IP Address of my Azure resources. Job well done!